Dan, my studly husband, is a baker. I'd be lying if I said that his ability to make an incredible puff pastry from scratch wasn't one of the reasons why I married him. As far as I go...I bake. Sometimes. And sometimes of those sometimes I don't burn it. Exact sciences are not my forte. Just ask my husband how my math skills are. He may have an answer for you after he stops laughing. That's why when I started making bread, it was by using the simplest recipe that I could find. Three ingredients and no kneading. It is awesome. Well then my baker husband (fiance at the time), took over the bread making duties one week and after that point I relinquished the bread making to him. Because, surprise-surprise, he was much better at it.
So one day Dan had been working super long hours at his new job (as a software programmer), and he was a little grumpy. One of the most valuable lessons I've learned as a woman is the power of a delicious sandwich. Seriously. If you can make a kick ass sandwich then you have an indispensable resource. Well, this night we happened to not have any sandwich making supplies in the house so I stopped and picked some up. The bread that I chose, one of our favorites, Grand Central Bakery's Como Bread. It's hearty but still light, has the perfect crunchy crust, and it makes delicious-my-grumpy-husband-needs-a-sandwich-to-be-less-grumpy sandwiches. The sandwich was a success, husband was less grumpy, and it also inspired him to learn how to make Como bread.
Pane di como, Como bread, is a northern Italian hearth bread. That's all the history you're getting on it. I looked. Really, I asked Google what the history of it was and Google didn't have the answer. It's delicious. That's all you really need to know. Oh, and that my husband has been described in one word as "tenacious," so I knew this Como bread was happening.
And it did. Friday I came home to delicious smelling house.

And these two beauties.

Here's how we made them. And by we, I mean Dan.
Flour, (Dan just used all purpose but bread flour can be used and we'll probably try the next loaves with that), yeast (not quick rising), milk, and malt syrup. The barley malt syrup is something that is on our scratch list, for sure. But down the road. A ways. Probably a long ways.
Special equipment: kitchen scale and kitchen aid mixer

First, we needed to make the starter. Like a sourdough, como bread needs a 'mother dough.' Unlike sourdough, this starter can just be made over night and, as far as I could (or couldn't find with Google), there's no real need/distinction/recorded use of years old starters like sourdoughs.
To begin, add the yeast to the warm water.

Then the barley malt syrup.

And room temperature milk, unique to como bread (I think).

135 grams of flour.

Mix until smooth.

Cover tightly with plastic wrap and store in a warm place over night. I say 'warm place' because we keep our house as cold as we can stand because electric heat is the worst for our budget. 55 degrees is not an unusual temperature for our thermostat, which is fine for us, but it does not make happy starters. Dan's home office has a cadet heater so we just turned that on, closed the door, and let the little starter do its thing over night.

The next morning the little starter should be all bubbly and happily doing its yeasty thing.
The rest was all done by Dan while I was at work. He did such a great job of taking so many photos of the process for me! I love that guy.

Next, he took the starter, put it in the kitchen aid and added some water to thin it out so it could mix better with more flour.

Then, he measured out more flour and salt. Look! He even included the flour bag, salt, and scale. He's so great.

Here, he mixed the additional flour with a spoon in the mixer.

Then he added the dough hook attachment to let the mixer do the rest of the hard work.

Mixed until smooth

Then he took the ball and kneaded it a few times on a floured surface for about a minute. When he explained this step to me, he apologized that he forgot to get a picture of the flowered surface before kneading. Aww.

Then he put it in an oiled bowl, covered with plastic wrap, brought it into his warm(er) office, and let it rise until it doubled in size (about 90 min).


And then he had two rounds of dough! Well, after he split the doubled dough anyway. Each of the rounds he shaped into a "boule".

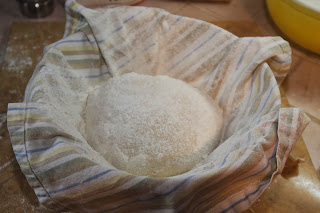
Now they're ready to be floured, and placed in little nestles of linen towels (100% cotton is really important) and covered tightly with plastic wrap until they double in size (again!).

And now you have two lovely dough rounds ready for baking! Dan sprinkled corn meal on the pan (oven stone is ideal and now on Dan's wish list) and scored the top for a 'rustic effect'

Bake at 400 degrees for about an hour and oh hey, look at this deliciousness.

Super crunchy thin crust. Light, slightly chewy middle with just the perfect amount of airy-ness. Yeah, we ate one loaf in two days. And just like that, we have a new standard bread recipe. There's no way we'll be able to go back to the other and it's inspired us to try even more breads. Because just like I learned the power of a well made sandwich for him, my husband has learned the power of fresh made bread for me. And just like that, homemade bread = happy marriage.
Here's the Pane di Como Recipe we snagged from Karen's Kitchen Stories.
Starter
1 tsp active dry yeast
1 tsp barley malt syrup
1/3 C warm water
2/3 C room temperature milk
135 grams flour
Dough
2 C warm water
860 grams flour
1 T salt
cornmeal for the baking stone
To make the starter:
In a large bowl, mix the water, yeast, and malt syrup and let it sit for about 5 minutes.
Add the milk and flour and stir until combined.
Cover the bowl with plastic wrap and let it sit until it is very bubbly overnight
To make the dough:
In the bowl of a stand mixer, mix the starter and water with a dough whisk or the paddle attachment.
Add the flour and salt, mix first by hand until all ingredients are blended, and then switch to the dough hook and mix on medium for about 4 minutes. The dough should be slightly sticky and elastic.
Remove the dough from the mixing bowl onto a lightly floured surface and knead by hand for about a minute.
Move the dough to an oiled dough rising bucket or large bowl, and cover with plastic wrap.
Allow the dough to rise until doubled in size, about 90 minutes.
Divide the dough in half and shape into boules (round loaves) and place them in a floured linen towel and cover in plastic wrap.
Allow the dough to rise until doubled, about an hour.
Preheat the oven to 400 degrees F.
When the loaves are ready, sprinkle the baking sheet with cornmeal
Bake the loaves until golden brown and the interior reaches about 200 to 210 degrees F. The bottom, of the loaves, when tapped, should sound hollow.
Allow the loaves to cool completely on a wire rack before digging in!