Baking and I have never been good friends, but I'm trying to make amends for all the cursing out over the years.
So, this past Sunday while the boys had their "Bike-Church" (it's like praying to the cycling Gods in the form of going on long training rides together where all the 20 year olds kick my 34 year old husband's butt into shape), I invited the ladies over for brunch with promises of homemade, from scratch frittata, focaccia, and mimosas (not from scratch) and a nice relaxing Sunday of eating, drinking, and hanging out. Except for the fact that I'm a masochist. There's a sick part of me that apparently loves the chaos of hosting get-togethers with a list of things to do that just spits in the face of the time in which I allot myself to do it.
The house needs to be cleaned? No problem. But you also need to go to the store to pick up those last min. things you forgot yesterday. Doable. Oh, and you need to do the dishes from the double dinner date you hosted last night? Oh crap. And you had the great idea to try not just one, but two foccica recipes. What the hell. Both of which needed at least 3 hours of prep/rising time/baking time before serving, the girls are coming over at 11 am, and you woke up at around 8:15 am. Dammit. Math is hard.
I was such a mess in the morning that when I (ran) to the New Seasons down the street, I brought home a savory scone and chocolate croissant for my husband. Food is a great apology.
Once the girls arrived and the mimosas got poured it was a great afternoon and both focaccias were delish. I have the pictures to show how to make one of them, but with the self-induced craziness, I gave up on the other.

Yea. This was my kitchen at around Noon. See that bowl to the left? It's full of the burned pieces. Because again, it was me baking.

But hey, once I got through all that, they did turn out pretty delicious.
The focaccia to the back is the style that I know and love and the one I'll describe. The ones in the forefront were delightfully light and airy and squishy and soft pillows of saltiness. But they're not what I think of as focaccia. I'll make it again for sure, but I'll probably give it a different name. Soft Squishy Salt Pillows could work.

I was such a mess in the morning that when I (ran) to the New Seasons down the street, I brought home a savory scone and chocolate croissant for my husband. Food is a great apology.
Once the girls arrived and the mimosas got poured it was a great afternoon and both focaccias were delish. I have the pictures to show how to make one of them, but with the self-induced craziness, I gave up on the other.

Yea. This was my kitchen at around Noon. See that bowl to the left? It's full of the burned pieces. Because again, it was me baking.

But hey, once I got through all that, they did turn out pretty delicious.
The focaccia to the back is the style that I know and love and the one I'll describe. The ones in the forefront were delightfully light and airy and squishy and soft pillows of saltiness. But they're not what I think of as focaccia. I'll make it again for sure, but I'll probably give it a different name. Soft Squishy Salt Pillows could work.

Focaccia (also known as schiacciat) is a thin, oily, soft centered, herbed, crunchy crusted, salted bit of delight. And really simple to make. When you can do math.

First, you'll need to activate your yeast. Add 1 tablespoon of sugar to warm water.

Then add some quick rising yeast. 2 1/4 teaspoons (that's equivalent to one 'packet').


First, you'll need to activate your yeast. Add 1 tablespoon of sugar to warm water.

Then add some quick rising yeast. 2 1/4 teaspoons (that's equivalent to one 'packet').

Let it activate for about 15 minutes until it's bubbly.

While you wait, in your mixer add the flour and salt. Give it a couple of mixes, then add the oil and the yeast once it's activated.

Mix on low

It'll start coming together and be sticky and tacky. Now you can turn up the speed to medium to finish kneading it until it's smooth.

Kind of like that.

Transfer to floured surface and knead a few more times by hand. If it's sticky, add flour.

Oil up a bowl that can fit the dough doubled.

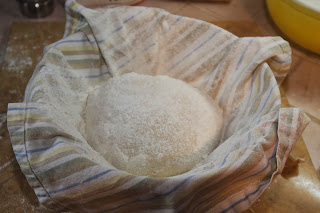
Plop the dough into the oiled bowl then flip it over to get maximum oil-ness.

Cover in plastic wrap and then let rise in a warm place until it has doubled in size, about an hour. Of course this meant my husband's office which has apparently become the only room in the house we're ok with turning the heat up in. Because a properly risen dough and activated yeasts are more important to us than not wearing a winter coat in the house. Don't judge.
The dough should double in size. I didn't take a picture of this. Then you oil the sheet pan(s) with oil, generously. Also did not take a picture of this. Use your imagination.
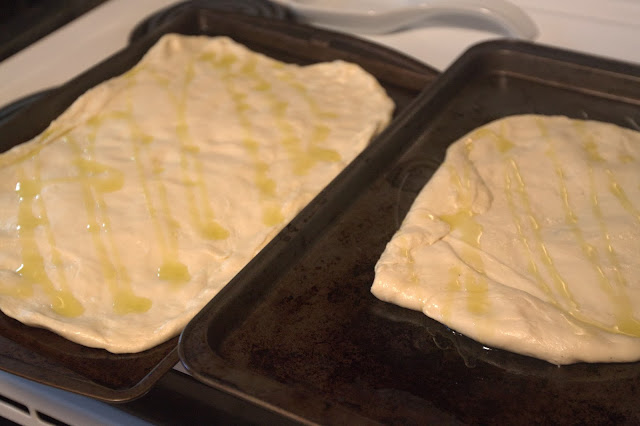
Roll your dough out onto the oiled pan so that it about fills the pan. I did not do a good job of this, clearly. I was kind of in a rush. Add more oil. Focaccia is really all about the 'excessive' (bah) oil. It adds to the flavor and creates that's reminiscent of a Chicago style pizza crust. So the recipe I was following said to roll it out on one pan. I opted to separate it in two. I knew I wouldn't have enough time to let them rise again before I wanted them to go in the oven, so I planned to put the smaller guy aside to deal with it later when it was properly risen. Sometimes I actually do think and plan ahead.

Before you leave it to rise again, dimple you dough. This is what creates that 'signature' focaccia look. So simple, right? I used to think that they were a complex reaction of the dough and ingredients and cooking; an Italian bread making style legacy. Don't judge.
So here's where I gave up on documentation. The dough should rise another hour and about double in size. I can't remember how much time I gave it, probably only 30 or 40, and it definitely didn't double. But, later in the day after the ladies had left and I was looking for an excuse to not clean, I remembered I had the smaller dough still in our little dough haven.

By this time it had finished rising nicely. So I coarsely chopped some fresh rosemary and generously sprinkled kosher salt over it, re-pre-heated our oven to 425 degrees, and I baked this lone focaccia for about 25 mins.

Until lightly browned. Like this. In reality (dammit, Emma!), I probably would have liked it a teeny bit little less brown.

Finalmente. Focaccia. Thin with a soft center, nice and crispy, a slight hint of oil, crunchy bottom, and salty rosemary deliciousness. I know I'll never make focaccia like I had in Italy, but it still reminded me of the little podere in Tuscany where we'd take "Eleven-zees" when our host would return from the market with warm, just baked, crispy, thin focaccia for our 11 am break from working on their farm. We'd put down our tools and gather together while we crunched and chewed on the warm bread. Ironically, those 11 ams were nothing close to the chaos surrounding these focaccias, but it gives me more incentive to make them again and share that type of moment and memories with my husband. And, with enough practice, not have any pans that need scrubbing.

Kind of like that.

Transfer to floured surface and knead a few more times by hand. If it's sticky, add flour.

Oil up a bowl that can fit the dough doubled.

Plop the dough into the oiled bowl then flip it over to get maximum oil-ness.

Cover in plastic wrap and then let rise in a warm place until it has doubled in size, about an hour. Of course this meant my husband's office which has apparently become the only room in the house we're ok with turning the heat up in. Because a properly risen dough and activated yeasts are more important to us than not wearing a winter coat in the house. Don't judge.
The dough should double in size. I didn't take a picture of this. Then you oil the sheet pan(s) with oil, generously. Also did not take a picture of this. Use your imagination.

Roll your dough out onto the oiled pan so that it about fills the pan. I did not do a good job of this, clearly. I was kind of in a rush. Add more oil. Focaccia is really all about the 'excessive' (bah) oil. It adds to the flavor and creates that's reminiscent of a Chicago style pizza crust. So the recipe I was following said to roll it out on one pan. I opted to separate it in two. I knew I wouldn't have enough time to let them rise again before I wanted them to go in the oven, so I planned to put the smaller guy aside to deal with it later when it was properly risen. Sometimes I actually do think and plan ahead.

Before you leave it to rise again, dimple you dough. This is what creates that 'signature' focaccia look. So simple, right? I used to think that they were a complex reaction of the dough and ingredients and cooking; an Italian bread making style legacy. Don't judge.
So here's where I gave up on documentation. The dough should rise another hour and about double in size. I can't remember how much time I gave it, probably only 30 or 40, and it definitely didn't double. But, later in the day after the ladies had left and I was looking for an excuse to not clean, I remembered I had the smaller dough still in our little dough haven.

By this time it had finished rising nicely. So I coarsely chopped some fresh rosemary and generously sprinkled kosher salt over it, re-pre-heated our oven to 425 degrees, and I baked this lone focaccia for about 25 mins.

Until lightly browned. Like this. In reality (dammit, Emma!), I probably would have liked it a teeny bit little less brown.

Finalmente. Focaccia. Thin with a soft center, nice and crispy, a slight hint of oil, crunchy bottom, and salty rosemary deliciousness. I know I'll never make focaccia like I had in Italy, but it still reminded me of the little podere in Tuscany where we'd take "Eleven-zees" when our host would return from the market with warm, just baked, crispy, thin focaccia for our 11 am break from working on their farm. We'd put down our tools and gather together while we crunched and chewed on the warm bread. Ironically, those 11 ams were nothing close to the chaos surrounding these focaccias, but it gives me more incentive to make them again and share that type of moment and memories with my husband. And, with enough practice, not have any pans that need scrubbing.
Focaccia
Ingredients
1 3/4 C of warm water
2 1/4 teaspoons of quick rise yeast
1 Tablespoon of sugar
5 C of bread flour
1 Tablespoon of kosher salt plus more for sprinkling
1 C of extra-virgin olive oil, divided
Directions
Combine the warm water, yeast, and sugar in a small bowl. Put the bowl in warm place until the yeast is bubbling. At least 15 mins.
Combine four and 1 Tablespoon of kosher salt. Mix a couple of times to combine. Then add 1/2 cup of olive oil and activated yeast. Mix on low until dough has come together.
Continue to knead for 5 more minutes on medium until smooth and soft. Sprinkle with flour if sticky.
Transfer dough to floured surface and knead by hand a couple of times. Sprinkle with flour if still sticky.
Coat inside of a bowl with oil and return dough to bowl. Cover with plastic wrap and let and put in a warm place until dough doubles in size. About 1 hour.
Coat a sheet pan with remaining 1/2 cup of olive oil. Put dough in the pan and stretch it to fit the pan (or divide the dough for two!)
When stretched out, poke holes (not all the way through) in the dough evenly spaced throughout the whole dough.
Sprinkle with more oil and return to warm place to double in size again. About 1 hour.
While dough is rising again, pre-heat oven to 425 degrees.
When dough is ready, pre-poke the dimples, sprinkle with more salt (kosher or sea), and herbs of choice. Bake for 25-30 minutes until lightly browned.
Let cool completely before slicing.